Manage a VPC Workflow with the ACK EC2-Controller
Create and manage a basic network topology using ACK EC2-Controller.
Setup
Although it is not necessary to use Amazon Elastic Kubernetes Service (Amazon EKS) or Amazon Elastic Container Registry (Amazon ECR) with ACK, this guide assumes that you have access to an Amazon EKS cluster. If this is your first time creating an Amazon EKS cluster and Amazon ECR repository, see Amazon EKS Setup and Amazon ECR Setup.
Prerequisites
This guide assumes that you have:
- Created an EKS cluster with Kubernetes version 1.16 or higher.
- Have access to Amazon ECR
- AWS IAM permissions to create roles and attach policies to roles.
- Installed the following tools on the client machine used to access your Kubernetes cluster:
- AWS CLI - A command line tool for interacting with AWS services.
- kubectl - A command line tool for working with Kubernetes clusters.
- eksctl - A command line tool for working with EKS clusters.
- Helm 3.8+ - A tool for installing and managing Kubernetes applications.
- Docker - A tool to build, share, and run containers.
Install ACK EC2-Controller
Deploy the EC2-Controller using the Helm chart, ec2-chart. Note, this example creates resources in the us-west-2 region, but you can use any other region supported in AWS.
Log into the Helm registry that stores the ACK charts:
aws ecr-public get-login-password --region us-east-1 | helm registry login --username AWS --password-stdin public.ecr.aws
Install Helm chart:
export SERVICE=ec2
export AWS_REGION=<aws region id>
export RELEASE_VERSION=$(curl -sL https://api.github.com/repos/aws-controllers-k8s/${SERVICE}-controller/releases/latest | jq -r '.tag_name | ltrimstr("v")')
helm install --create-namespace -n ack-system oci://public.ecr.aws/aws-controllers-k8s/ec2-chart "--version=${RELEASE_VERSION}" --generate-name --set=aws.region=${AWS_REGION}
Check the CRDs have been installed using kubectl get crds:
NAME                                         CREATED AT
adoptedresources.services.k8s.aws            2022-10-15T01:58:26Z
dhcpoptions.ec2.services.k8s.aws             2022-10-15T01:58:26Z
elasticipaddresses.ec2.services.k8s.aws      2022-10-15T01:58:26Z
eniconfigs.crd.k8s.amazonaws.com             2022-09-30T23:00:32Z
fieldexports.services.k8s.aws                2022-10-15T01:58:26Z
instances.ec2.services.k8s.aws               2022-10-15T01:58:27Z
internetgateways.ec2.services.k8s.aws        2022-10-15T01:58:27Z
natgateways.ec2.services.k8s.aws             2022-10-15T01:58:27Z
routetables.ec2.services.k8s.aws             2022-10-15T01:58:27Z
securitygrouppolicies.vpcresources.k8s.aws   2022-09-30T23:00:35Z
securitygroups.ec2.services.k8s.aws          2022-10-15T01:58:28Z
subnets.ec2.services.k8s.aws                 2022-10-15T01:58:28Z
transitgateways.ec2.services.k8s.aws         2022-10-15T01:58:28Z
vpcendpoints.ec2.services.k8s.aws            2022-10-15T01:58:28Z
vpcs.ec2.services.k8s.aws                    2022-10-15T01:58:28Z
For a full list of available values in the Helm chart, refer to values.yaml.
Configure IAM permissions
The controller requires permissions to invoke EC2 APIs. Once the service controller is deployed configure the IAM permissions using the value SERVICE=ec2 throughout. The recommended IAM Policy for EC2-Controller can be found in recommended-policy-arn.
[Optional] Create a VPC and Subnet
This section is optional and will NOT be using a single manifest file to deploy the VPC and Subnet. The purpose of this section is to demonstrate a simple use case to shed light on some of the functionality before jumping into a more complex deployment.
Create the VPC using the provided YAML and kubectl apply:
cat <<EOF > vpc.yaml
apiVersion: ec2.services.k8s.aws/v1alpha1
kind: VPC
metadata:
  name: vpc-tutorial-test
spec:
  cidrBlocks:
  - 10.0.0.0/16
  enableDNSSupport: true
  enableDNSHostnames: true
EOF

kubectl apply -f vpc.yaml
Check the VPC Status using kubectl describe:
> kubectl describe vpcs
...
Status:
  Ack Resource Metadata:
    Owner Account ID:  <ID>
    Region:            us-west-2
  Cidr Block Association Set:
    Association ID:  vpc-cidr-assoc-<ID>
    Cidr Block:      10.0.0.0/16
    Cidr Block State:
      State:  associated
  Conditions:
    Last Transition Time:  2022-10-12T17:26:08Z
    Message:               Resource synced successfully
    Reason:
    Status:                True
    Type:                  ACK.ResourceSynced
  Dhcp Options ID:         dopt-<ID>
  Is Default:              false
  Owner ID:                <ID>
  State:                   available
  Vpc ID:                  vpc-<ID>
Events:                    <none>
The VPC resource synced successfully and is available. Note the vpc-<ID>.
Create the Subnet using vpc-<ID>, the provided YAML, and kubectl apply:
cat <<EOF > subnet.yaml
apiVersion: ec2.services.k8s.aws/v1alpha1
kind: Subnet
metadata:
  name: subnet-tutorial-test
spec:
  cidrBlock: 10.0.0.0/20
  vpcID: vpc-<ID>
EOF

kubectl apply -f subnet.yaml
Check the Subnet availability and ID using kubectl describe:
> kubectl describe subnets
...
Status:
  Ack Resource Metadata:
    Arn:                       arn:aws:ec2:us-west-2:<ID>:subnet/subnet-<ID>
    Owner Account ID:          <ID>
    Region:                    us-west-2
  Available IP Address Count:  4091
  Conditions:
    Last Transition Time:           2022-10-12T17:36:53Z
    Message:                        Resource synced successfully
    Reason:
    Status:                         True
    Type:                           ACK.ResourceSynced
  Default For AZ:                   false
  Map Customer Owned IP On Launch:  false
  Owner ID:                         <ID>
  Private DNS Name Options On Launch:
  State:      available
  Subnet ID:  subnet-<ID>
Events:       <none>
Delete the resources:
kubectl delete -f subnet.yamlkubectl delete -f vpc.yaml
Both resources were successfully deployed, managed, then deleted by their respective controllers. Although contrived, this example highlights how easy it can be to deploy AWS resources via YAML files and how it feels like managing any other K8s resource.
In this example, we used multiple YAML manifests and waited for the vpcID to be generated before manually updating the Subnet custom resources to reference that VPC ID. This technique is less aligned to a fully declarative, GitOps-style of configuration management because dependencies between resources need to be manually resolved using a specific order of operations. The next example uses a single YAML manifest to deploy an entire network topology using ACK Resource References, a technique that better aligns with a fully automated and declarative GitOps-style of configuration management.
Create a VPC Workflow
In this section, we create a network topology consisting of multiple, connected resources using a single YAML manifest. The following resources are present in this network topology:
- 1 VPC
- 1 Instance
- 1 Internet Gateway
- 1 NAT Gateways
- 1 Elastic IPs
- 2 Route Tables
- 2 Subnets (1 Public; 1 Private)
- 1 Security Group
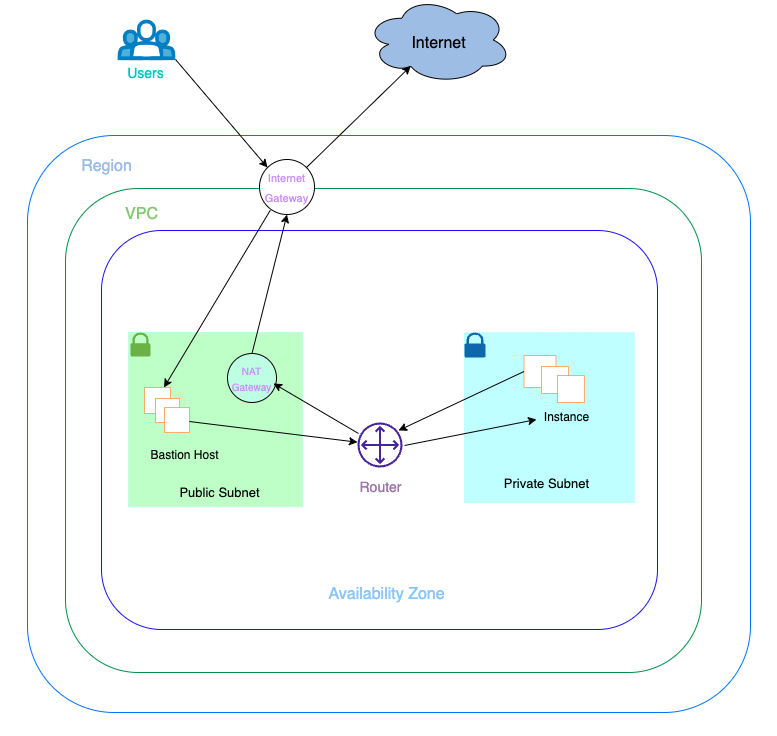
The VPC is connected to the Internet through an Internet Gateway. A NAT Gateway is created in the public Subnet with an associated Elastic IP. An Instance is deployed into the private Subnet which can connect to the Internet using the NAT Gateway in the public Subnet. Lastly, one Route Table (public) will contain a route to the Internet Gateway while the other Route Table (private) contains a route to the NAT Gateway.
Notice that the ACK custom resources reference each other using “*Ref” fields inside the manifest and the user does not have to worry about finding vpc-ID when creating the Subnet resource manifests.
Refer to API Reference for EC2 to find the supported reference fields.
Note, if the region used while installing the Helm chart is different from us-west-2, we need to modify availability zones and CIDR ranges in the provided YAML to match the needed region.
Deploy the resources using the provided YAML and kubectl apply -f vpc-workflow.yaml:
cat <<EOF > vpc-workflow.yaml
apiVersion: ec2.services.k8s.aws/v1alpha1
kind: VPC
metadata:
  name: tutorial-vpc
spec:
  cidrBlocks:
  - 10.0.0.0/16
  enableDNSSupport: true
  enableDNSHostnames: true
  tags:
    - key: name
      value: vpc-tutorial
---
apiVersion: ec2.services.k8s.aws/v1alpha1
kind: InternetGateway
metadata:
  name: tutorial-igw
spec:
  vpcRef:
    from:
      name: tutorial-vpc
---
apiVersion: ec2.services.k8s.aws/v1alpha1
kind: NATGateway
metadata:
  name: tutorial-natgateway1
spec:
  subnetRef:
    from:
      name: tutorial-public-subnet1
  allocationRef:
    from:
      name: tutorial-eip1
---
apiVersion: ec2.services.k8s.aws/v1alpha1
kind: ElasticIPAddress
metadata:
  name: tutorial-eip1
spec:
  tags:
    - key: name
      value: eip-tutorial
---
apiVersion: ec2.services.k8s.aws/v1alpha1
kind: RouteTable
metadata:
  name: tutorial-public-route-table
spec:
  vpcRef:
    from:
      name: tutorial-vpc
  routes:
  - destinationCIDRBlock: 0.0.0.0/0
    gatewayRef:
      from:
        name: tutorial-igw
---
apiVersion: ec2.services.k8s.aws/v1alpha1
kind: RouteTable
metadata:
  name: tutorial-private-route-table-az1
spec:
  vpcRef:
    from:
      name: tutorial-vpc
  routes:
  - destinationCIDRBlock: 0.0.0.0/0
    natGatewayRef:
      from:
        name: tutorial-natgateway1
---
apiVersion: ec2.services.k8s.aws/v1alpha1
kind: Subnet
metadata:
  name: tutorial-public-subnet1
spec:
  availabilityZone: us-west-2a
  cidrBlock: 10.0.0.0/20
  mapPublicIPOnLaunch: true
  vpcRef:
    from:
      name: tutorial-vpc
  routeTableRefs:
  - from:
      name: tutorial-public-route-table
---
apiVersion: ec2.services.k8s.aws/v1alpha1
kind: Subnet
metadata:
  name: tutorial-private-subnet1
spec:
  availabilityZone: us-west-2a
  cidrBlock: 10.0.128.0/20
  vpcRef:
    from:
      name: tutorial-vpc
  routeTableRefs:
  - from:
      name: tutorial-private-route-table-az1
---
apiVersion: ec2.services.k8s.aws/v1alpha1
kind: SecurityGroup
metadata:
  name: tutorial-security-group
spec:
  description: "ack security group"
  name: tutorial-sg
  vpcRef:
     from:
       name: tutorial-vpc
  ingressRules:
    - ipProtocol: tcp
      fromPort: 22
      toPort: 22
      ipRanges:
        - cidrIP: "0.0.0.0/0"
          description: "ingress"
EOF
The output should look similar to:
vpc.ec2.services.k8s.aws/tutorial-vpc created
internetgateway.ec2.services.k8s.aws/tutorial-igw created
natgateway.ec2.services.k8s.aws/tutorial-natgateway1 created
elasticipaddress.ec2.services.k8s.aws/tutorial-eip1 created
routetable.ec2.services.k8s.aws/tutorial-public-route-table created
routetable.ec2.services.k8s.aws/tutorial-private-route-table-az1 created
subnet.ec2.services.k8s.aws/tutorial-public-subnet1 created
subnet.ec2.services.k8s.aws/tutorial-private-subnet1 created
securitygroup.ec2.services.k8s.aws/tutorial-security-group created
Check the resources you just created using kubectl describe:
kubectl describe vpcs
kubectl describe internetgateways
kubectl describe routetables
kubectl describe natgateways
kubectl describe elasticipaddresses
kubectl describe subnets
kubectl describe securitygroups
Note that Subnet gets into an ‘available’ state with a ACK.ReferencesResolved = True condition attached notifying users that the references (VPC, RouteTable) have been found and resolved:
Status:
  Ack Resource Metadata:
    Arn:                       arn:aws:ec2:us-west-2:<ID>:subnet/subnet-0ba22f5820bb41584
    Owner Account ID:          <ID>
    Region:                    us-west-2
  Available IP Address Count:  4091
  Conditions:
    Last Transition Time:           2022-10-13T14:54:39Z
    Status:                         True
    Type:                           ACK.ReferencesResolved
    Last Transition Time:           2022-10-13T14:54:41Z
    Message:                        Resource synced successfully
    Reason:
    Status:                         True
    Type:                           ACK.ResourceSynced
  Default For AZ:                   false
  Map Customer Owned IP On Launch:  false
  Owner ID:                         515336597380
  Private DNS Name Options On Launch:
  State:      available
  Subnet ID:  subnet-<ID>
Validate
This network setup should allow Instances deployed in the Private Subnet to connect to the Internet. To validate this behavior, deploy an Instance into the private Subnet and the public Subnet (bastion host). After waiting until the Instances are in an available state, ssh into the bastion host, then ssh into the private Subnet Instance, and test internet connectivity. A SecurityGroup is required by both instances launched in the public and private Subnets.
Note, we need to provide Subnet and SecurityGroup ID’s in the yaml manually; run kubectl describe subnets and kubectl describe securitygroups commands to get ID’s. We need to create key-pair via console and provide in yaml to launch instances.
Deploy an Instance into the Private Subnet using provided YAML and kubectl apply -f tutorial-instance-private.yaml:
cat <<EOF > tutorial-instance-private.yaml
apiVersion: ec2.services.k8s.aws/v1alpha1
kind: Instance
metadata:
  name: tutorial-instance-private
spec:
  imageID: ami-02b92c281a4d3dc79 # AL2; us-west-2
  instanceType: c3.large
  subnetID: subnet-<private-ID>
  securityGroupIDs:
  - sg-<ID>
  keyName: us-west-2-key # created via console
  tags:
    - key: producer
      value: ack
EOF
Deploy the bastion host Instance into the Public Subnet using provided YAML and kubectl apply -f tutorial-bastion-host.yaml:
cat <<EOF > tutorial-bastion-host.yaml
apiVersion: ec2.services.k8s.aws/v1alpha1
kind: Instance
metadata:
  name: tutorial-bastion-host
spec:
  imageID: ami-02b92c281a4d3dc79 # AL2 in us-west-2
  instanceType: c3.large
  subnetID: subnet-<public-ID>
  securityGroupIDs:
  - sg-<ID>
  keyName: us-west-2-key # created via console
  tags:
    - key: producer
      value: ack
EOF
Validate if the instances are created successfully with kubectl describe instances
If you see following type of error in the output of above command, then find one of the available instance types for your Region and Availability zone and replace in the above YAML files
Message: Unsupported: Your requested instance type (c3.large) is not supported in your requested Availability Zone (us-west-2a). Please retry your request by not specifying an Availability Zone or choosing us-west-2b, us-west-2c, us-west-2d, us-west-2e.
You can use below command to find EC2 instance types supported in your AWS region and availability zone (for example, to check if c5.large is supported in us-west-2 region and us-west-2a availability zone):
aws ec2 describe-instance-type-offerings --location-type "availability-zone" --filters Name=location,Values=us-west-2a --region us-west-2 --query "InstanceTypeOfferings[*].[InstanceType]" --output text | sort | grep c5.large
Find out IDs of the instances in public and private subnets by running this command kubectl get instances
NAME                      ID
tutorial-instance-private *i-xxxxxxxxxxxxxxxx*
tutorial-bastion-host *i-xxxxxxxxxxxxxxxx*
Note, we need to get Public IPV4 DNS for bastion host instance from EC2 console and substitute in the below commands. We can get the Private IP for private instance on running kubectl describe instance tutorial-instance-private
Deployed 2 instances; one to each Subnet
- The instance in the public subnet will be the bastion host so we can ssh to the Instance in the private Subnet
scp -i "/path/created_key_in_console_for_region.pem" "/path/created_key_in_console_for_region.pem" ec2-user@<Public IPV4 DNS>:
ssh -i "/path/created_key_in_console_for_region.pem" ec2-user@<Public IPV4 DNS>
ssh -i "created_key_in_console_for_region.pem" ec2-user@<Private IP>
Validate instance in private subnet can connect to internet
- Try to ping websites from your private subnet, sample output looks like
ping google.com

PING google.com (142.250.217.78) 56(84) bytes of data.
64 bytes from sea09s29-in-f14.1e100.net (142.250.217.78): icmp_seq=1 ttl=102 time=8.30 ms
64 bytes from sea09s29-in-f14.1e100.net (142.250.217.78): icmp_seq=2 ttl=102 time=7.82 ms
64 bytes from sea09s29-in-f14.1e100.net (142.250.217.78): icmp_seq=3 ttl=102 time=7.77 ms
^C
--- google.com ping statistics ---
3 packets transmitted, 3 received, 0% packet loss, time 2003ms
Cleanup
Remove all the resources using kubectl delete command.
kubectl delete -f tutorial-bastion-host.yaml
kubectl delete -f tutorial-instance-private.yaml
kubectl delete -f vpc-workflow.yaml
Note, deleting resources can take a few minutes as we have couple of resources created using a single manifest, do not kill the kubectl delete command, wait until it finishes completely.
The output of delete commands should look like
instance.ec2.services.k8s.aws "tutorial-bastion-host" deleted
instance.ec2.services.k8s.aws "tutorial-instance-private" deleted
vpc.ec2.services.k8s.aws/tutorial-vpc deleted
internetgateway.ec2.services.k8s.aws/tutorial-igw deleted
natgateway.ec2.services.k8s.aws/tutorial-natgateway1 deleted
elasticipaddress.ec2.services.k8s.aws/tutorial-eip1 deleted
routetable.ec2.services.k8s.aws/tutorial-public-route-table deleted
routetable.ec2.services.k8s.aws/tutorial-private-route-table-az1 deleted
subnet.ec2.services.k8s.aws/tutorial-public-subnet1 deleted
subnet.ec2.services.k8s.aws/tutorial-private-subnet1 deleted
securitygroup.ec2.services.k8s.aws/tutorial-security-group deleted
To remove the EC2 ACK service controller, related CRDs, and namespaces, see ACK Cleanup.
To delete your EKS clusters, see Amazon EKS - Deleting a cluster.